
This post will guide Magento 2 developers through implementing a message queue retry mechanism using the RabbitMQ dead-letter exchange feature.
To assist us in this endeavor, we will leverage the Message Queue Retry module by run-as-root.
RabbitMQ is a widely embraced open-source Message Queue software, facilitating seamless interaction and scalability across numerous applications. As a proficient messaging broker, RabbitMQ furnishes a unified platform catering to asynchronous messaging needs. Within this platform, applications gain the capability to transmit and receive messages securely, with RabbitMQ diligently ensuring the sanctuary of your messages until they are consumed.
Since version 2.1.0, Magento 2 has offered native RabbitMQ support, enabling effortless queue configuration through XML settings. For further details, you can explore additional information here.
This feature functions as a safety net within the messaging architecture, intended to manage messages that encounter unsuccessful processing by the consumer.
The dead-letter exchange operates as a mechanism for directing these problematic messages to a designated queue referred to as a dead-letter queue. This facilitates developers in isolating and inspecting troublesome messages without interrupting the primary processing flow, enabling them to analyze these messages, identify the underlying reasons for processing failures, and implement essential adjustments to ensure smooth operation.
It's particularly recommended for scenarios where upholding message integrity, diagnosing processing errors, and averting message loss is paramount.
Imagine having the capability to schedule a comprehensive price uplift by 10% for the entire catalog of your store.
A typical case in e-commerce is exporting orders to an ERP or OMS. We will implement an asynchronous order export architecture, where for each placed order, a message is created with the order id and sent to a queue. So that a consumer can later read this message and export it to the external system.
To simplify this example, let's declare the topic's name, exchange, queue, and bindings with the same name: erp_order_export.
To handle this messaging, we'll utilize RabbitMQ as the broker.
You can find the complete code for the module on this repository.
We have to create four files to declare our queue.
1<?xml version="1.0"?>2<config xmlns:xsi="http://www.w3.org/2001/XMLSchema-instance"3 xsi:noNamespaceSchemaLocation="urn:magento:framework:Communication/etc/communication.xsd">4 <topic name="erp_order_export" request="CristianoPacheco\OrderExport\Api\Data\OrderExportDataInterface"/>5</config>1<?xml version="1.0"?>2<config xmlns:xsi="http://www.w3.org/2001/XMLSchema-instance"3 xsi:noNamespaceSchemaLocation="urn:magento:framework-message-queue:etc/consumer.xsd">4 <consumer name="erp_order_export" queue="erp_order_export" connection="amqp"5 handler="CristianoPacheco\OrderExport\Queue\Consumer\ErpOrderExportConsumer::execute"6 />7</config>1<?xml version="1.0"?>2<config xmlns:xsi="http://www.w3.org/2001/XMLSchema-instance"3 xsi:noNamespaceSchemaLocation="urn:magento:framework-message-queue:etc/publisher.xsd">4 <publisher topic="erp_order_export">5 <connection name="amqp" exchange="erp_order_export"/>6 </publisher>7</config>1<?xml version="1.0"?>2<config xmlns:xsi="http://www.w3.org/2001/XMLSchema-instance"3 xsi:noNamespaceSchemaLocation="urn:magento:framework-message-queue:etc/topology.xsd">4 <exchange name="erp_order_export" connection="amqp" type="topic">5 <binding id="erp_order_export" topic="erp_order_export" destinationType="queue" destination="erp_order_export"/>6 </exchange>7</config>Run the command below in order to have Magento send the command to create the exchange, queue and bindings on RabbitMQ:
1bin/magento setup:upgradeIt will look like this on RabbitMQ admin:
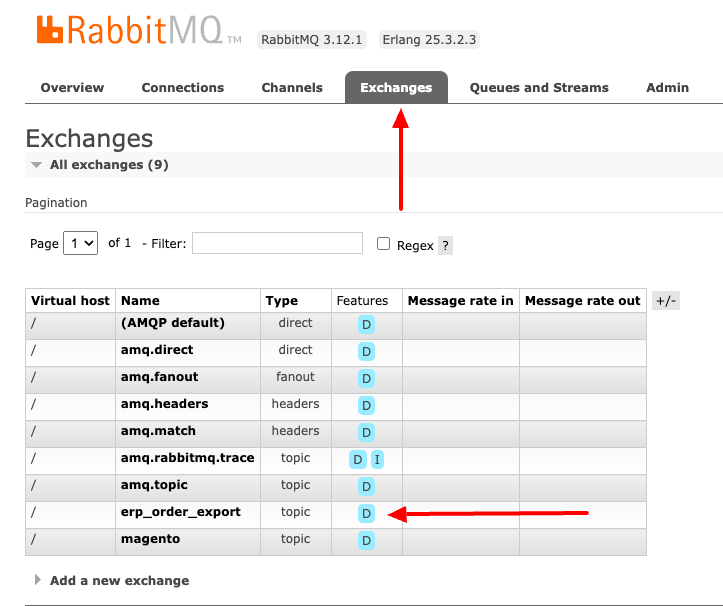
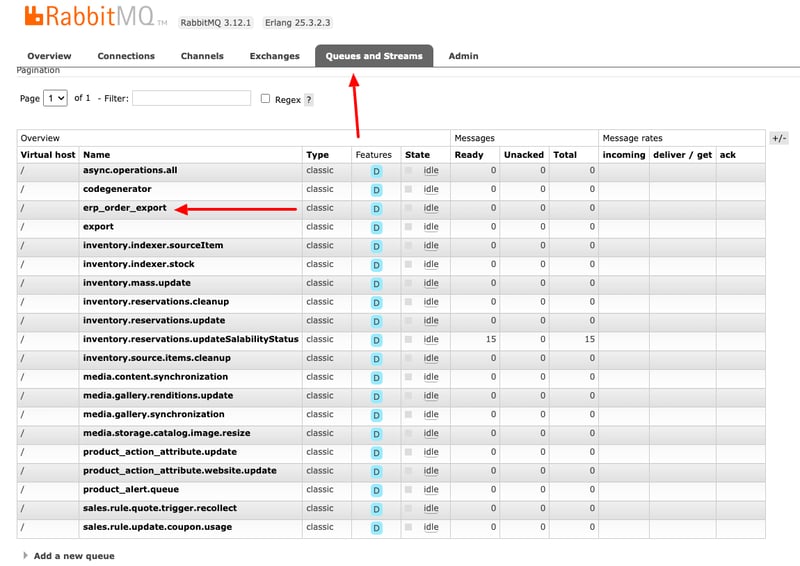
Visually, our configs will generate something like this:
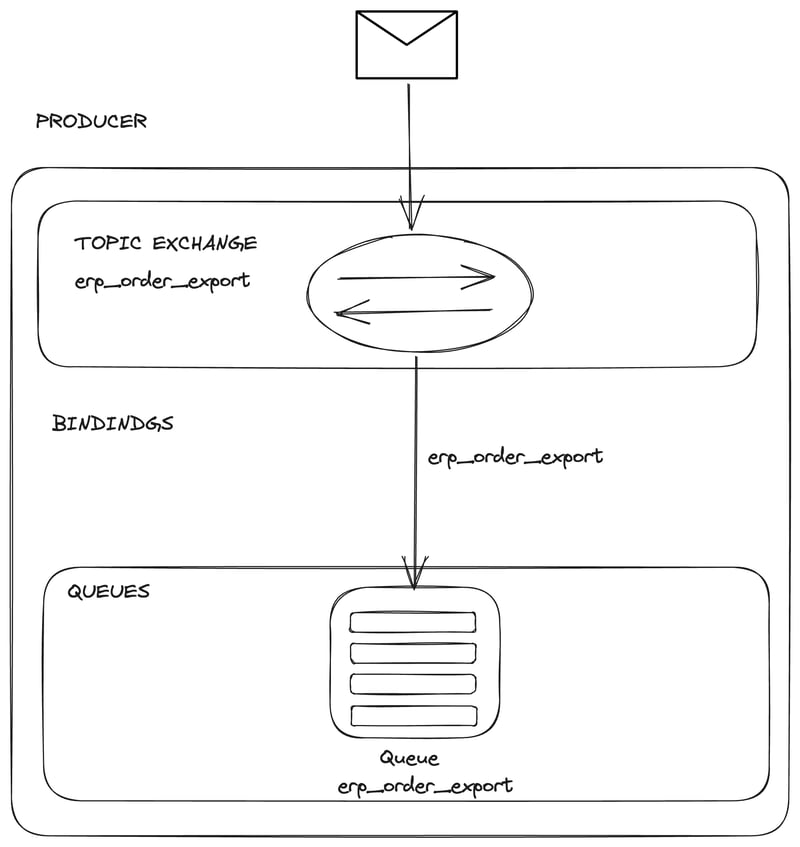
Note: It would make more sense to configure a direct exchange. However, up to the current version of Magento (2.4.6), only topic exchanges are supported.
Now that the queue is set up, we must send the order ID to the erp_order_export queue every time a successful order is placed.
We can easily do this by listening to the event sales_model_service_quote_submit_success via an observer:
1<?xml version="1.0"?>2<config xmlns:xsi="http://www.w3.org/2001/XMLSchema-instance"3 xsi:noNamespaceSchemaLocation="urn:magento:framework:Event/etc/events.xsd">4 <event name="sales_model_service_quote_submit_success">5 <observer name="erp_export_order" instance="CristianoPacheco\OrderExport\Observer\SendOrderToQueueObserver"/>6 </event>7</config>I won't post here the Observer code or the entire implementation. The complete working code is in the repository. If you want to simulate the scenarios, please install the module.
Our consumer will use a service to perform our "fake" order export. To simulate an error, our service will always throw an exception:
1declare(strict_types=1); 2 3namespace CristianoPacheco\OrderExport\Service; 4 5use CristianoPacheco\OrderExport\Api\Data\OrderExportDataInterface; 6use Exception; 7 8class ExportOrderToErpService 9{10 public function execute(OrderExportDataInterface $orderExportData): void11 {12 $orderId = $orderExportData->getOrderId();13 throw new Exception("The order $orderId id is invalid");14 }15}With the current configuration, orders will enter the erp_order_export queue and can be "exported" during the execution of our consumer.
To run our consumer and export only one order per execution, run the following command:
1bin/magento queue:consumer:start erp_order_export --single-thread --max-messages=1What will happen at the end of the execution?
The service will throw an exception, and it will be handled here:
vendor/magento/framework-message-queue/Consumer.php:261
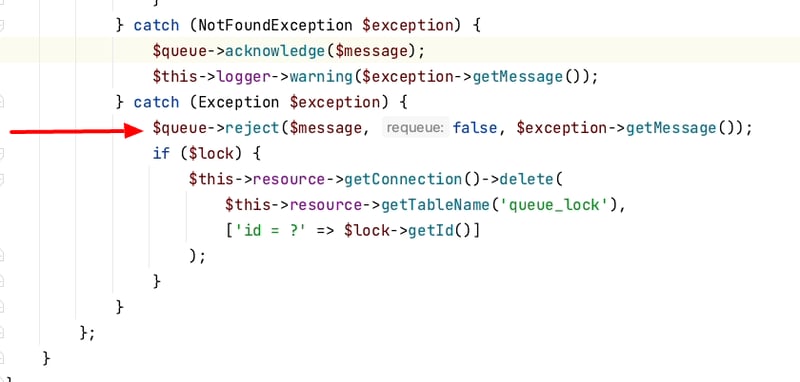
As you can see, the message will be rejected, and the requeue flag will have false as the value. In other words, the message will be removed from the queue, and the order will not be exported to the ERP.
Well done! We managed to simulate a transaction loss.
In day-to-day scenarios, probably (I hope so), exceptions are handled at the service or the consumer's execution entry point, and the message would be sent back to the original queue or even taken manually in cases of error, such as sending an alert, or persisting the message in a database, etc.
What if there was a way to automatically identify without manual work when there are errors in message processing, allowing the possibility to optimize and standardize this process?
Yes, there is. We can delegate this hard work to RabbitMQ via a dead-letter exchange.
So, how do we ensure that our messages reach their destination in the face of these intermittent failures? This is where the concept of a retry strategy comes into play. A retry strategy outlines how we handle failed operations by making subsequent attempts at sending the same message. When exporting an order to ERP, adopting a well-defined retry strategy can significantly enhance the reliability of our application.
For this specific case, three attempts are reasonable.
So let's define our requirements, it should be possible to:
Steps to achieve our goal:
Steps 1 and 2 can be configured in the queue declaration, and RabbitMQ natively supports it.
Step 3 is a capability provided by the run_as_root Message Queue Retry module.
Firstly we need to install the message queue retry module and enable the behavior to persist the messages on the database after the retry limit is reached.
Now we have to configure our dead-letter exchange. The complete implementation of code below can be found here.
We'll use the erp_order_export_delay as the name for the topic, exchange, queue and bindings.
Declaring the topic:
1<?xml version="1.0"?>2<config xmlns:xsi="http://www.w3.org/2001/XMLSchema-instance"3 xsi:noNamespaceSchemaLocation="urn:magento:framework:Communication/etc/communication.xsd">4 <topic name="erp_order_export" request="CristianoPacheco\OrderExport\Api\Data\OrderExportDataInterface"/>5 <topic name="erp_order_export_delay" request="CristianoPacheco\OrderExport\Api\Data\OrderExportDataInterface"/>6</config>Declaring the retry limit:
1<?xml version="1.0"?>2<config xmlns:xsi="http://www.w3.org/2001/XMLSchema-instance"3 xsi:noNamespaceSchemaLocation="urn:RunAsRoot:module:RunAsRoot_MessageQueueRetry:/etc/queue_retry.xsd">4 <topic name="erp_order_export" retryLimit="3"/>5</config>Declaring the dead-letter exchange:
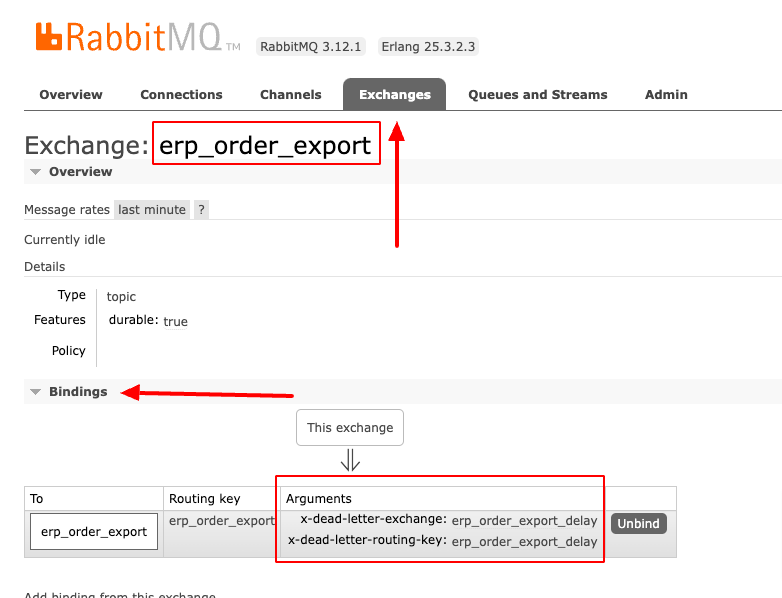
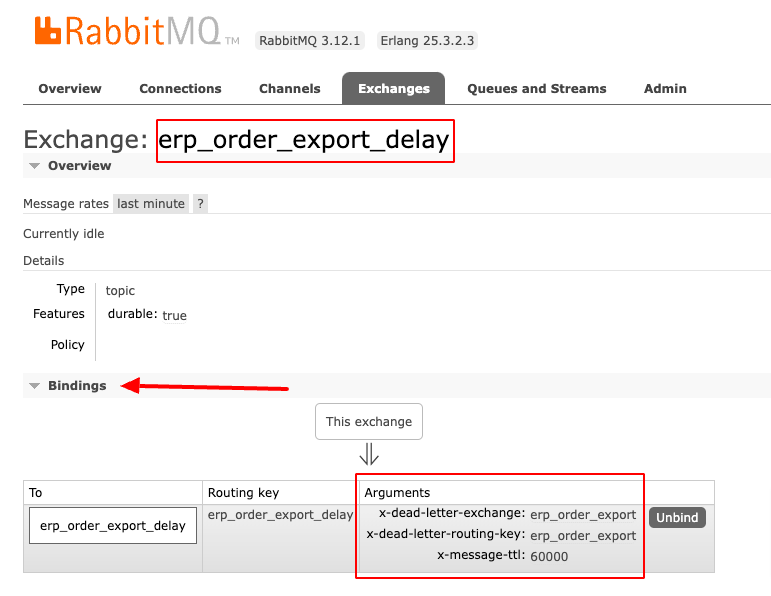
1<?xml version="1.0"?> 2<config xmlns:xsi="http://www.w3.org/2001/XMLSchema-instance" 3 xsi:noNamespaceSchemaLocation="urn:magento:framework-message-queue:etc/topology.xsd"> 4 <exchange name="erp_order_export" connection="amqp" type="topic"> 5 <binding id="erp_order_export" topic="erp_order_export" destinationType="queue" destination="erp_order_export"> 6 <arguments> 7 <argument name="x-dead-letter-exchange" xsi:type="string">erp_order_export_delay</argument> 8 <argument name="x-dead-letter-routing-key" xsi:type="string">erp_order_export_delay</argument> 9 </arguments>10 </binding>11 </exchange>12 <exchange name="erp_order_export_delay" connection="amqp" type="topic">13 <binding id="erp_order_export_delay" topic="erp_order_export_delay" destinationType="queue"14 destination="erp_order_export_delay">15 <arguments>16 <argument name="x-dead-letter-exchange" xsi:type="string">erp_order_export</argument>17 <argument name="x-dead-letter-routing-key" xsi:type="string">erp_order_export</argument>18 <argument name="x-message-ttl" xsi:type="number">60000</argument><!-- 1 minute in milliseconds -->19 </arguments>20 </binding>21 </exchange>22</config>Let's take a closer look at each change in the file above.
1...2<arguments>3 <argument name="x-dead-letter-exchange" xsi:type="string">erp_order_export_delay</argument>4 <argument name="x-dead-letter-routing-key" xsi:type="string">erp_order_export_delay</argument>5</arguments>6...1...2<exchange name="erp_order_export_delay" connection="amqp" type="topic">3 <binding id="erp_order_export_delay" topic="erp_order_export_delay" destinationType="queue" destination="erp_order_export_delay">4...Remembering that this queue does not have a consumer.
1...2<arguments>3 <argument name="x-dead-letter-exchange" xsi:type="string">erp_order_export</argument>4 <argument name="x-dead-letter-routing-key" xsi:type="string">erp_order_export</argument>5 <argument name="x-message-ttl" xsi:type="number">60000</argument><!-- 1 minute in milliseconds -->6</arguments>7...Visually, our new configs will generate something like this:
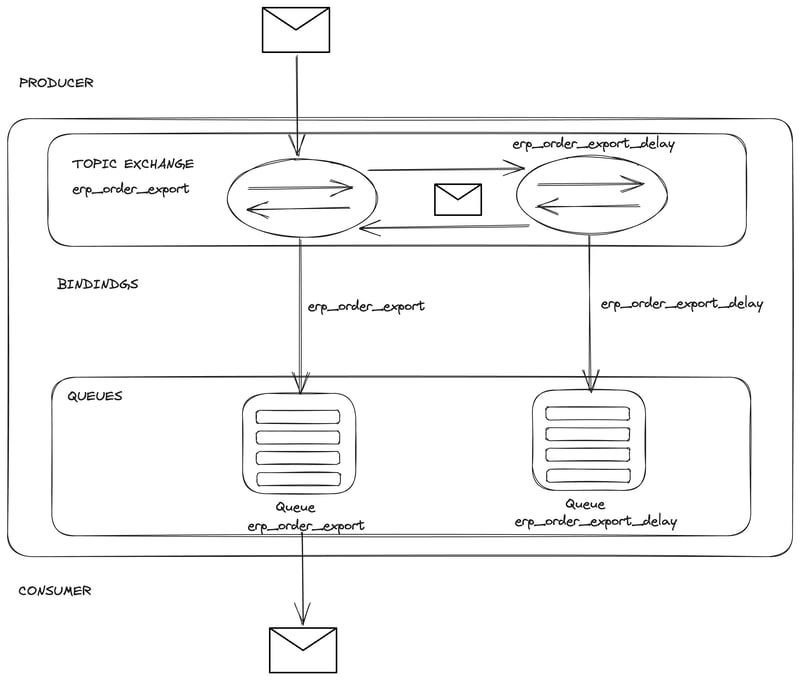
Note: We always send the messages to an exchange and the exchange will forward the messages to one or more queues. It is the same with dead-letter exchanges.
Now we have to manually delete the erp_order_export exchange and queue in RabbitMQ, because it won't be updated. You can do it in the RabbitMQ admin panel or via CLI.
After you did it, you have to run the command below to reflect our changes in RabbitMQ:
1bin/magento setup:upgradeNow if we navigate again in the RabbitMQ panel we should see:
Exchanges:
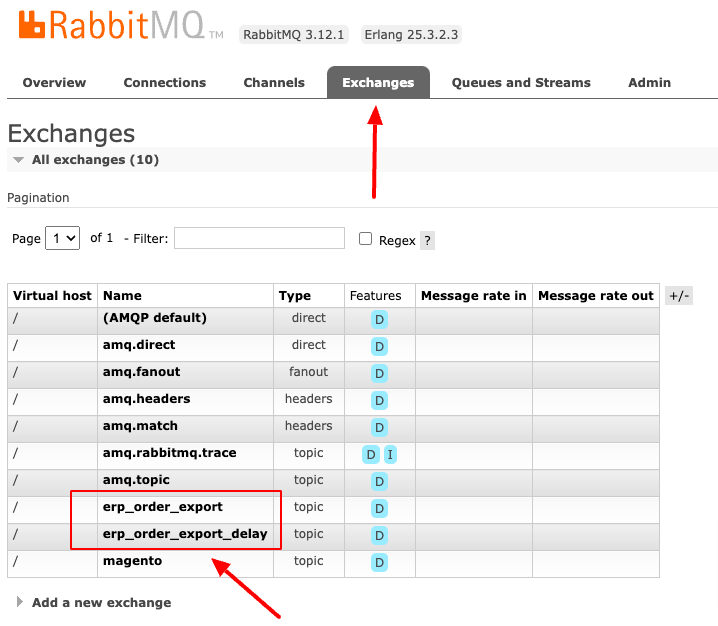
If we open our exchanges and expand the bindings, it is possible to see the arguments we have declared before:
Queues:
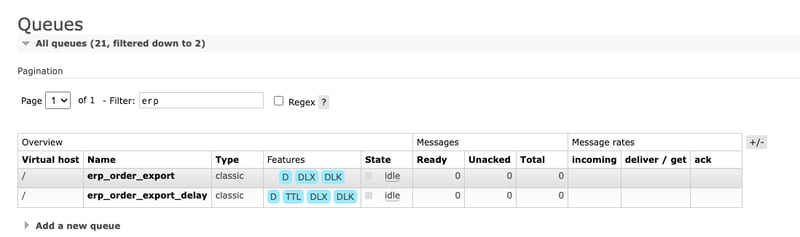
Did you notice that queues now have a few more features?
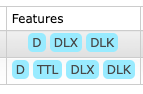
A homework for you: hover the mouse over each feature and wait a few seconds, a caption will be displayed informing what it is about. Also access each queue and expand the bindings section, see the values contained there.
Now that we finished our RabbitMQ configuration, let's place a new order and start the erp_order_export consumer to see what will occur.
After placing an order a new message is in the erp_order_export queue:
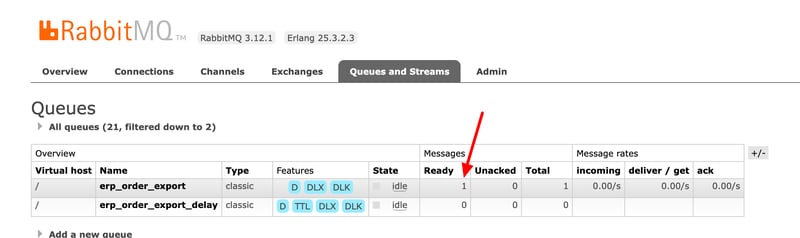
Now let's start our consumer:
1bin/magento queue:consumer:start erp_order_export --single-thread --max-messages=1Now if we take a look at the queues we'll see:
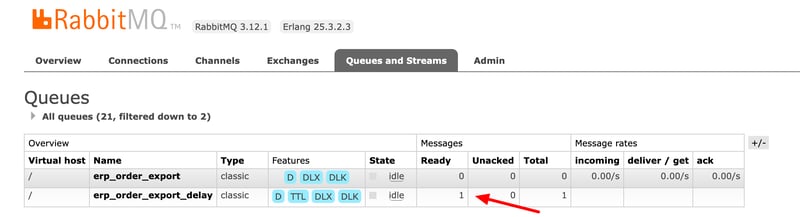
During message consumption, our service threw an exception, simulating a problem and the message was rejected. RabbitMQ sent the message to the erp_order_export_delay queue.
After one minute the message was automatically sent back to the erp_order_export queue.
Let's inspect the message headers:
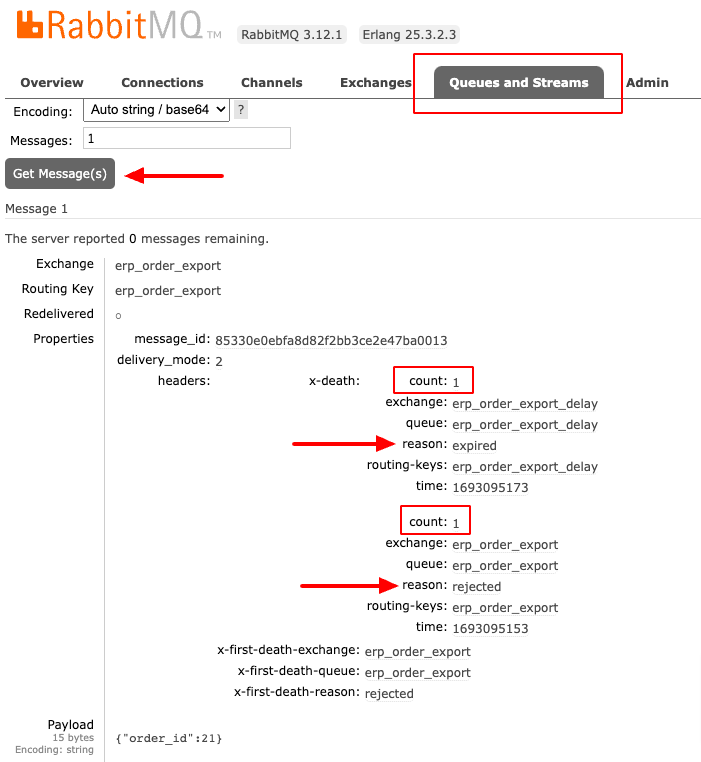
The x-death header has interesting information about the retries.
Relevant attributes for us to analyse are:
So, what that image says is: (reading from bottom to top)
It has 20 seconds difference because I configured the TTL for 20 seconds :)
This is the message headers after the second retry:
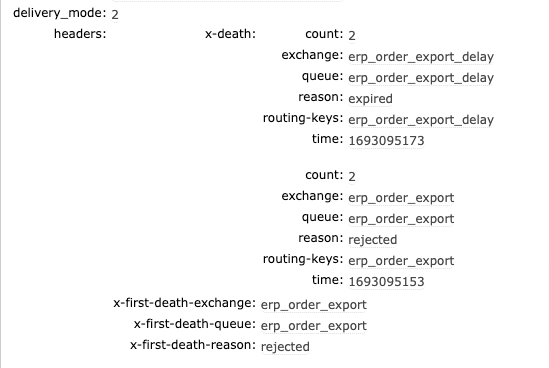
After the third retry:
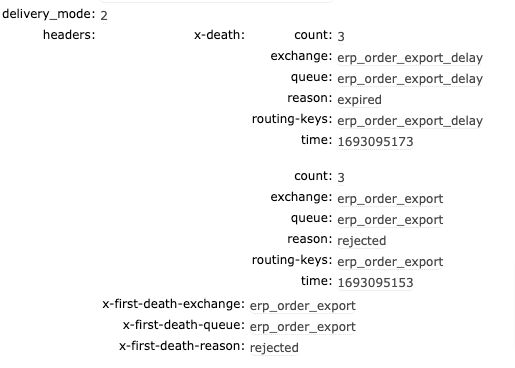
What will occur in the next consumer execution?
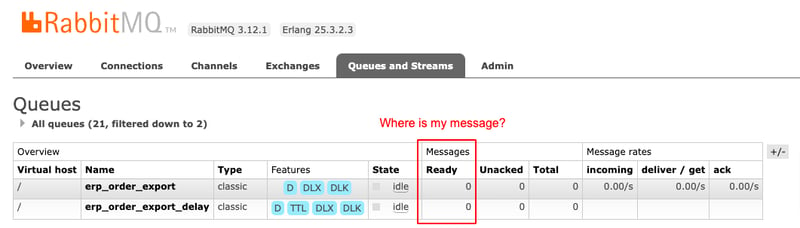
So, the run-as-root module intercepted the message processing failure, verified that the message has reached the retry limit and then persisted the message in the Magento database.
Now it is possible to manage the message through the admin panel, in the path:
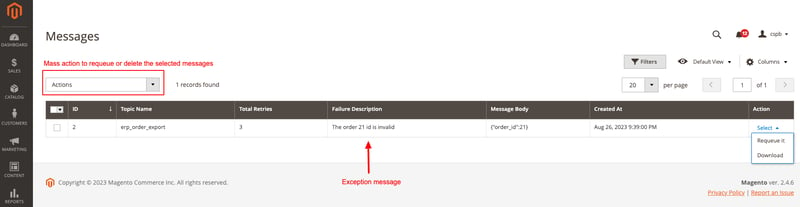
Now you can decide if you'll discard the message or send it back to the erp_order_export queue.
In summary, while multiple approaches exist to tackle this issue, my aim has been to show a straightforward method for implementing a retry mechanism.
That's it for today, happy coding!
Image from Dominic Kurniawan Suryaputra on Unsplash
Connect with Vlad, our Magento 2 expert, to optimize your message queue mechanisms using RabbitMQ.


11.11.26

30.09.26